The best ultrasonic cleaner for car parts is the Magnasonic. It offers powerful cleaning with a 40 kHz frequency and a generous tank size.
Ultrasonic cleaners are great for cleaning small, detailed car parts. Parts cleaner ultrasonic uses high-frequency sound waves to remove dirt and grime. This ultrasonic cleaner solution is gentle yet thorough. Several auto parts ultrasonic cleaners stand out in the market today.
The Magnasonic Ultrasonic Cleaner offers a 20-oz stainless steel tank and multiple cleaning modes. KUNPHY’s cleaner is user-friendly and has a one-touch operation. The BYASKZIV ultrasonic car parts cleaner provides dual cleaning modes and a durable stainless steel tank. VEVOR’s 15L cleaner is the best industrial ultrasonic cleaner.
Keep car parts spotless with these top ultrasonic cleaner parts. The car parts ultrasonic cleaner removes grease, dirt, and grime fast using sound waves. Check out 7 top picks of the best ultrasonic cleaner auto parts for sparkling results every time.
How does an ultrasonic cleaner work?
Ultrasonic cleaners work by creating high-frequency sound, usually in the range of 20-400 kHz, that creates microscopic bubbles in a cleaning solution through a process known as cavitation. Upon collapsing, these bubbles release immense, focused energy and pressure to give surfaces a very effective scrubbing action at a microscopic level. Such action reaches tiny crevices and removes dirt, oils, and contaminants on items submerged into the solution, hence making it perfect for jewelry, mechanical parts, and dental instruments cleaning.
7 Best Ultrasonic Cleaners for Car Parts – Reviews
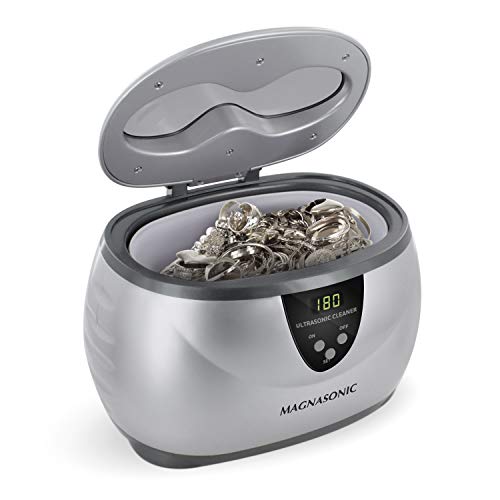
1. Magnasonic Ultrasonic Car Parts Cleaner

The Magnasonic Ultrasonic Cleaner is the best ultrasonic cleaner for car parts. It is the perfect choice for anyone who wants to keep their jewelry, eyeglasses, watches, and other delicate items in pristine condition.
Flawless customers for this item include jewelry lovers, opticians, and watch collectors who need a reliable and efficient way to clean their valuable items without causing any damage.
Pros:
- Digital Timer for precise cleaning.
- Five Cleaning Modes to accommodate different items.
- 20oz Stainless Steel Tank ensures durability.
- Suitable for all types of jewelry, eyeglasses, watches, and more.
Cons:
- May be too large for limited counter space.
- Heavier than some other models.
The Magnasonic Ultrasonic Cleaner features a digital timer that allows users to set the cleaning duration precisely. This feature is especially beneficial for those who want to avoid over-cleaning or under-cleaning their items.
With five different cleaning modes, you can choose the most suitable setting for the item you are cleaning, ensuring optimal results every time.
Further, the 20-oz stainless steel tank offers a robust and spacious container for cleaning multiple items at once. This is particularly useful for those who have a large collection of jewelry or multiple pairs of eyeglasses and watches.
The stainless steel construction ensures that the tank remains rust-free and long-lasting, providing reliable performance over time.
2. Kunphy Ultrasonic Cleaner for Auto Parts

The KUNPHY Ultrasonic Jewelry Cleaner is an excellent purchase for individuals who frequently wear car, jewelry, glasses, or dentures. It is also perfect for those who value maintaining their accessories in pristine condition without the hassle of manual cleaning.
If you are someone who appreciates convenience and efficiency in your cleaning routine, this product is designed for you.
Pros:
- One-Touch Operation makes it extremely easy to use.
- 46 KHz Ultrasonic Frequency ensures thorough cleaning.
- Compact Size makes it easy to store and handle.
- Versatile – Suitable for rings, glasses, jewelry, and dentures.
Cons:
- Small Capacity might not be suitable for larger items.
- Limited Color Options – Only available in white.
The KUNPHY Ultrasonic Jewelry Cleaner features a 46 KHz ultrasonic frequency, which provides a deep and thorough clean for your jewelry and other small items.
This high frequency allows the cleaner to penetrate even the smallest crevices, ensuring that every part of your item is cleaned effectively. Users will benefit from the enhanced cleanliness and the restored shine of their jewelry, making them look as good as new.
Another notable feature is the one-touch operation, making it incredibly user-friendly. Even if you are not tech-savvy, you can easily operate this machine with a single press of a button.
Besides, the compact dimensions (Height: 3.0 inches, Width: 3.0 inches, Length: 7.0 inches, Weight: 1.21 pounds) make it portable and easy to store. This means you can keep your cleaning routine efficient and space-saving, perfect for any household.
3. Byaskziv Ultrasonic Automotive Parts Cleaner

The BYASKZIV Ultrasonic Jewelry Cleaner is ideal for individuals who frequently use and maintain jewelry, eyeglasses, rings, watch straps, and dentures.
This ultrasonic cleaner for automotive parts is perfect for meticulous individuals who value cleanliness and want to ensure their items remain in pristine condition.
Whether you are a jeweler, optometrist, or just someone who loves to keep their personal items sparkling clean, this ultrasonic cleaner is designed to meet your needs.
Pros:
- Dual Cleaning Modes for versatile use.
- 304 Stainless Steel Tank ensures durability.
- 48KHz Ultrasonic Frequency for effective cleaning.
- Compact Dimensions make it easy to store and use.
Cons:
- Limited Tank Size may not accommodate larger items.
- Single Color Option (White) may not suit all tastes.
The BYASKZIV Ultrasonic Jewelry Cleaner features dual cleaning modes, providing flexibility for different types of items. This means you can choose a quick clean for lightly soiled objects or a more thorough clean for items that need extra care.
The 48KHz ultrasonic frequency is highly effective in removing dirt and grime from even the most intricate details of your jewelry and other delicate items, ensuring a thorough clean every time.
Another standout feature is the 304 stainless steel tank, which is both durable and resistant to corrosion. This ensures longevity and consistent performance, giving you peace of mind that your cleaner will remain effective over time.
The compact dimensions of the cleaner (Height: 3.3 Inches, Width: 3.8 Inches, Length: 7.6 Inches) make it an excellent choice for those with limited space, as it can easily fit on a countertop or be stored away when not in use.
4. VisiClean Ultrasonic Car Parts Cleaning Machine

The Ultrasonic Jewelry Cleaning Machine by VisiClean is perfect for those who want to keep their precious items in pristine condition.
Whether you own silver, gold, or diamond rings, earrings, necklaces, or even need to clean glasses, dentures, retainers, CPAP equipment, coins, mouthguards, or razors, this professional-grade cleaner is designed for you.
It is particularly ideal for individuals who want a thorough and efficient cleaning solution at home, saving both time and money on professional cleaning services.
Pros:
- Versatile cleaning for a wide range of items.
- Compact dimensions make it easy to store and handle.
- Professional-grade cleaning results at home.
- User-friendly and easy to operate.
Cons:
- May require multiple cycles for heavily soiled items.
- Not suitable for certain delicate gemstones.
- Noisy operation during the cleaning process.
The Ultrasonic Jewelry Cleaning Machine boasts impressive features that make it a valuable addition to your home. With its compact dimensions (Height: 5.6 Inches, Width: 5.4 Inches, Length: 8.7 Inches), it fits conveniently on any countertop or storage space.
The ultrasonic technology ensures that even the tiniest crevices of your jewelry and other items are thoroughly cleaned, removing dirt, grime, and oils effectively. This results in a sparkling finish that enhances the appearance and longevity of your precious items.
One of the standout benefits of this VisiClean model is its user-friendly design. Even if you are new to ultrasonic cleaning, the straightforward controls make the process simple and intuitive. You can achieve professional results without the need for harsh chemicals or lengthy manual scrubbing.
Besides, the machine is built to handle a wide range of items, making it a versatile tool for maintaining various personal belongings, from jewelry to everyday items like eyeglasses and dentures.
5. Vevor 15l Ultrasonic Cleaner for Car Parts

The VEVOR 15L Ultrasonic Cleaner is excellent for professionals in the repair tools industry, particularly those who frequently clean industrial parts and metal objects.
If you work with wrenches, screwdrivers, or other intricate tools requiring thorough cleaning, this ultrasonic cleaner is perfect for you.
Pros:
- Large capacity of 15L allows for cleaning multiple items at once.
- Digital timer ensures precise cleaning duration.
- Heater helps to enhance the cleaning efficiency.
- 40kHz ultrasonic frequency for advanced cleaning capabilities.
- Durable construction suitable for industrial use.
Cons:
- Size may be too large for casual users or those with limited space.
- Price might be higher compared to smaller ultrasonic cleaners.
- 110V power requirement may not be compatible in regions with different standards.
The VEVOR 15L Ultrasonic Cleaner boasts several features that make it a valuable tool for professionals. Its large capacity allows users to clean several items simultaneously, significantly improving productivity.
The digital timer ensures that each cleaning cycle is accurately timed, preventing over- or under-cleaning of tools. Additionally, the built-in heater helps dissolve stubborn grime and residues, making the cleaning process more effective.
Utilizing a 40 kHz ultrasonic frequency, this cleaner provides advanced cleaning power that penetrates deep into the surfaces of metal parts and tools. Its durable construction ensures that it can withstand the rigors of industrial use, making it a long-term investment for any repair workshop.
However, potential buyers should consider the size and price of the unit, as well as the power requirements, to ensure it fits their specific needs and environment.
6. Industrial Grade Car Parts Ultrasonic Cleaner
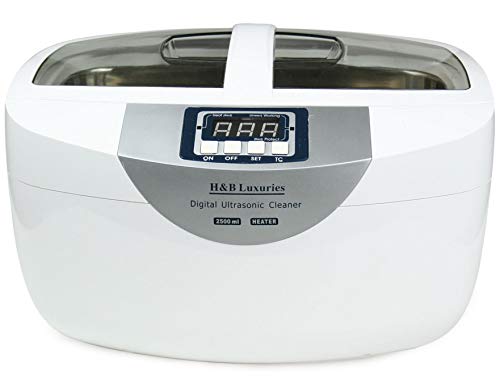
The Industrial Grade Ultrasonic Cleaner 160 Watts 2.5 Liters with Heater is perfect for individuals who require efficient and thorough cleaning of intricate items.
This ultrasonic cleaner for auto parts is excellent for gun enthusiasts, jewelers, dental professionals, and mechanics who need to clean small parts like car parts, carburetor parts, jewelry, and dental tools.
Pros:
- High-powered 160 Watts for deep cleaning
- Large 2.5-liter capacity
- Integrated heater for enhanced cleaning
- Suitable for a variety of small and intricate items
Cons:
- May be too large for casual or infrequent users
- Slightly heavier at 5.5 pounds
The Industrial Grade Ultrasonic Cleaner comes with a powerful 160 Watts motor that ensures the deep and effective cleaning of even the most intricate items.
With its substantial 2.5-liter capacity, users can clean multiple items at once, making it highly efficient for busy professionals. The integrated heater enhances the cleaning process by helping to loosen and dissolve tough residues.
This ultrasonic parts cleaner is designed with versatility in mind, making it suitable for a range of applications, from cleaning delicate jewelry to maintaining gun parts and carburetors.
The dimensions of 6.0 inches in height, 8.0 inches in width, and 8.0 inches in length make it compact enough to fit on most workbenches while still offering ample cleaning space.
However, the weight of 5.5 pounds might be a consideration for those who need to move the unit frequently.
7. Kaimashi Ultrasonic Cleaner Car Parts

The Kaimashi Ultrasonic Cleaner 6.5L is the perfect solution for anyone needing to perform detailed and thorough cleaning of small engine parts, specifically carburetor parts.
This ultrasonic automotive parts cleaner is best for mechanics, automotive lovers, and anyone involved in the restoration of vehicle parts. Its stainless steel construction ensures durability, while the digital timer and heater provide convenience and efficiency.
Pros:
- Large 6.5L capacity for cleaning multiple or larger parts at once
- Digital timer for precise cleaning cycles
- Heater function to enhance cleaning efficiency
- Stainless steel construction for durability and easy maintenance
Cons:
- May be too large for users with limited space
- Higher price point compared to smaller models
- Requires proper handling to avoid damage to delicate parts
The Kaimashi Ultrasonic Cleaner 6.5L comes with a digital timer and heater, making it highly efficient for cleaning carburetor parts.
The digital timer allows users to set precise cleaning durations, ensuring that each part receives the right amount of cleaning time without the risk of overexposure. This feature is especially beneficial for mechanics who require consistent and repeatable cleaning results.
Furthermore, the heater function significantly improves the cleaning process by heating the cleaning solution, which helps in breaking down grease, grime, and other contaminants more effectively. The stainless steel construction not only ensures the machine’s longevity but also makes it easy to clean and maintain.
Overall, the Kaimashi Ultrasonic Cleaner is a valuable tool for anyone serious about maintaining their carburetor parts in fresh condition.
Buying Guide: Best Ultrasonic Cleaner for Car Parts
Size and Capacity
Pick a cleaner that fits your car parts. Larger tanks hold bigger items like Carburetors and Engine Components. Smaller ones work well for nuts, bolts, and injectors. Choose based on what you clean most often.
Cleaning Power
Look at the ultrasonic frequency. Around 40 kHz suits most parts, removing grease and dirt without damage. Higher frequencies clean delicate components, while lower ones tackle heavy grime.
Tank Material
Stainless steel lasts longer and resists corrosion. It also withstands heat and chemicals better than other materials.
Heating Function
Warm water improves cleaning by breaking down grease faster. A built-in heater speeds up the process and gives better results.
Timer Settings
Adjustable timers help control cleaning time. Short cycles work for light dirt, while longer ones clean stubborn grime. More control means better results.
Cleaning Solution Compatibility
Some cleaners need special solutions, while others work with water-based or biodegradable options. Check what works best for your parts and budget.
Build Quality and Durability
A strong, well-built unit lasts longer. A thick tank, sturdy lid, and reliable electronics prevent leaks and breakdowns.
Ease of Use
Simple controls, a digital display, and clear buttons make operation hassle-free. Drain valves help with easy water disposal.
Noise Level
Some machines get loud, especially larger ones. A quieter model keeps the workspace comfortable.
Price and Warranty
Balance cost with features. Higher-end models offer better durability and cleaning power. A good warranty protects against defects and ensures long-term use.
Best for Specific Needs
- Heavy-duty parts: Go for a large tank, strong frequency, and heating.
- Small parts: A compact cleaner with precise controls works best.
- Regular use: A durable unit with an easy-to-use design saves time.
Choose the best ultrasonic cleaner for car parts based on size, power, and features. A good unit saves time, cleans better, and extends the life of car parts.
Conclusion
The best ultrasonic cleaner for car parts can significantly enhance your upkeep routine. A quality ultrasonic car parts cleaner saves time and ensures thorough cleaning. It removes dirt and grime from intricate areas that manual cleaning often misses. Consider tank size, frequency range, and power when making your choice.
Investing in a reliable car parts cleaner, ultrasonic ensures longevity and efficiency for your car parts. Remember to check user reviews and product specifications to find the best ultrasonic cleaner for your needs. Regular maintenance of your car parts not only improves performance but also extends their lifespan.
As you explore the best ultrasonic car cleaners, prioritize brands with a strong reputation in the automotive sector. With the best ultrasonic cleaner, you can achieve professional-level results at home. Leap and elevate your car care process today.
Your vehicle will thank you for it.
FAQs
What shouldn’t to put in an ultrasonic cleaner?
Never put delicate jewelry like pearls, emeralds, or opals in an ultrasonic cleaner, as they can be damaged. Avoid placing watches unless they’re specifically marked as water-resistant to a sufficient depth. Don’t clean items with loose stones or glued components, as the vibrations can dislodge them. Keep wood, fabric, and most plastic items out, as they can be damaged or warped. Electronics should also never go in an ultrasonic cleaner.
Is an ultrasonic cleaner good for car parts?
Well, ultrasonic cleaners do an excellent job of cleaning car parts and are especially appropriate for smaller pieces: carburetors, injectors, and bearings. With the help of high-frequency waves, microbubbles collapse to have dirt, grease, and carbon washed off the surface without damage to intricate areas of the subject of cleaned. Less practical for larger-sized engine blocks and transmission cases, since most consumer-level ultrasonic cleaners have size limitations.
What is in Harbor Freight’s ultrasonic cleaning solution?
Harbor Freight’s ultrasonic cleaning solution is an aqueous alkaline cleaner for cleaning dirt, grease, and oxidation off of metal parts and jewelry. It is not provided what exactly makes up the formulation, but some common ultrasonic cleaning ingredients could include surfactants, detergents, and mild alkaline agents. Because this is kind of an obscure product formulation, I need to note that these details may not be fully accurate.
What is in Harbor Freight’s ultrasonic cleaning powder?
The two main active ingredients of the ultrasonic cleaning powder available from Harbor Freight are sodium carbonate, or washing soda, and sodium metasilicate. These help degrade oils, grease, and other contaminants due to the action of ultrasonic vibrations. This may also include surfactants to increase the cleaning efficiency. Because the formulation is not published by Harbor Freight, I am correct only partially on specific ingredient issues.
What liquid should be used in the ultrasonic cleaner?
Most ultrasonic cleaners use water mixed with a small amount of mild detergent, which works quite well for general cleaning. For specific items, such as jewelry or metals, use a cleaning solution designed for those materials. Strong chemicals should not be used because they can damage items or even the cleaner itself.
What liquid should be used in an ultrasonic cleaner for carburetors?
First, prepare a solution with water and a mild detergent for ultrasonic cleaners to clean carburetors. The addition of several drops of dish soap or any special ultrasonic cleaning solution will help to loosen dirt, grease, and deposits. Avoid using strong chemicals like bleach; these will damage the carburetor. Ensure the solution is warm but not boiling for best performance.
Will an ultrasonic cleaner remove rust?
An ultrasonic cleaner will be able to remove light rust from small items. It creates minute vibrations in some cleaning solutions that loosen the rust particles. In cases of tougher rust, you may need to use a stronger cleaning agent with the ultrasonic cleaner. Always check whether the material can support ultrasonic cleaning to avoid damage. This method is effective for delicate tools, metal parts, and other small objects.
What is the best solution for ultrasonic cleaning car parts?
The best solution for cleaning car parts with an ultrasonic cleaner is a combination of the right cleaning solution and machine. Choose a powerful ultrasonic cleaner with a large enough tank for the parts. Use a specialized cleaning solution designed for grease, oil, and dirt removal. Heat the solution for better results. The ultrasonic waves will loosen grime, leaving the parts clean and ready for use.
What is the best solution for cleaning car parts?
The best way to clean car parts is to use a degreaser and a soft brush. Wash off dirt and grease with warm water. For tough stains, apply a specialized cleaner. Rinse thoroughly to remove all residue. Dry with a clean cloth to prevent rust. Use non-abrasive tools to avoid scratches.
Related posts:
- 10 Best Vacuum Cleaners for Car Cleaning in 2025
- 2 Best Surface Cleaner Attachments for Pressure Washer
- 5 Best All-Purpose Cleaners for Car Interiors Reviewed 2025
- 2 Best Steam Cleaner for Dust Mites: Top Picks 2025
- 5 Best Steam Cleaners for Detailing Cars: Top Picks for Spotless Shine
- 10 Best Foam Guns for Car Wash (Tested & Reviewed 2025)
- 7 Best-Rated Car Cleaning Products (Top Picks 2025)